Receive stock for an owner
3PL add-on For: Warehouse staff, Compliance manager Checked on 18.0.0.2.0, 18.0.1.0.0
When an owner (one of your 3PL clients) buys goods from a supplier and has them shipped to your warehouse, you receive them on a receipt held for that owner. The units become the owner's stock, not yours: the supplier's data names the owner as the buyer, the inbound DSCSA document is issued in the owner's name, and your own stock, orders and documents don't change.
Background: the modules follow the reading that an owner's receipt is custody and not a purchase by the 3PL, so the supplier's transaction information and statement are recorded with the owner as the buyer (FD&C Act § 582(c)(1)(A)(i), § 582(g)(1); FDA interoperable exchange guidance (September 2023); see Compliance background).
The usual order is: create the receipt (3PL-IN-01), attach the supplier's file when it comes (3PL-IN-02), then scan and validate when the goods arrive (3PL-IN-03). When no file is coming, record the owner's confirmation or the supplier's statement document before you validate (3PL-IN-04). Goods received without any of these are held: see Receive an owner's goods before their data.
Create a receipt held for an owner
Create the receipt as soon as the owner tells you that its supplier is shipping, or when the goods arrive. Held for Owner is what makes it the owner's receipt.
With Odoo Enterprise's Barcode app, see Scan owner stock in the Barcode app.
Who: Rx Tracking User or Manager
Requires: Rx Tracking (DSCSA): 3PL and title model, with 3PL switched on.
Before you start:
- 3PL is on and Held for Owner shows on receipts. See Turn on third-party logistics for a company.
- The warehouse has a verified 3PL facility license. See Record and verify our facility licenses.
- The owner has an active owner profile. See Create an owner profile.
- The supplier is an authorized trading partner (its DSCSA role and a valid license), because the receipt is checked against it when you select Validate. See Get an owner transfer through the owner, counterparty and facility checks.
- The goods are not on one of your own purchase orders. Your purchase is received the usual way: Receive with the supplier's EPCIS file.
-
Go to Inventory ‣ Operations ‣ Receipts and select New.
Result: a New Receipt form opens in Draft. Held for Owner is shown under Supplier Document.
-
Fill in:
- Receive From: the owner's supplier, for example
Bluepeak Pharmaceuticals Inc. - Held for Owner: the owner company, for example
Northwind Generics LLC. Choose the company itself, never one of its contacts. - Source Document (optional): the owner's purchase order number, for example
NWG-PO-2702.
Result: Owner Receipt Kind and Owner Instruction appear under Held for Owner.
- Receive From: the owner's supplier, for example
-
Leave Owner Receipt Kind empty, or select Owner's purchase. An empty kind counts as the owner's purchase. For goods the owner ships to you from its own site, see Receive the owner's own goods as a custody receipt.
-
On the Operations tab, select Add a line, choose the product and enter the Demand, for example
Demoprazoleand6. -
Select Mark as Todo.
Result: the receipt gets its number, for example
WH/IN/00039, and is Ready. The buttons Attach Supplier Data and Record Owner Confirmation appear, and a yellow banner says "No supplier data yet for this owner's receipt: attach the supplier's EPCIS file or transaction statement, or record the owner's confirmation that it holds them. Otherwise its DSCSA lots are held when the receipt is validated."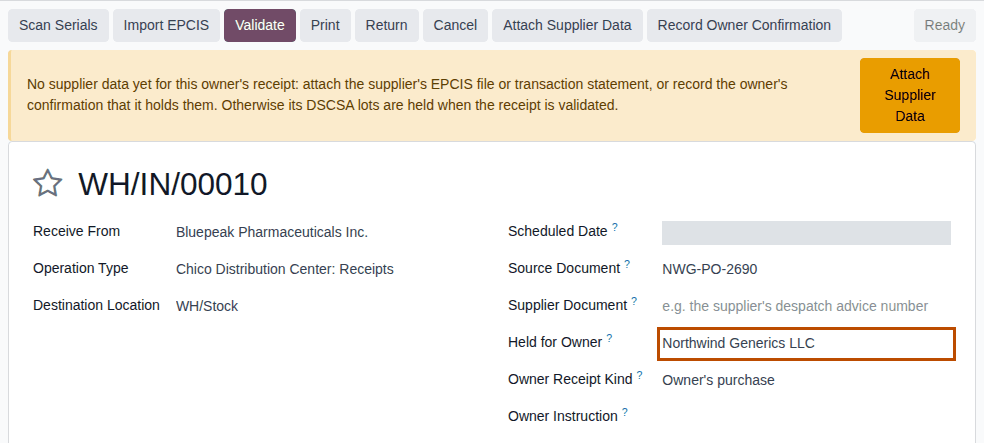
Result: the receipt is Ready and held for the owner. Records: the receipt WH/IN/NNNNN; its DSCSA lines carry the owner, and
lines added later take it too. Nothing is received yet.
Only non-DSCSA products on the receipt
A receipt held for an owner that carries only products that are not DSCSA products (for example Adhesive Bandages) shows no banner and
none of the DSCSA buttons, and validates as in standard Odoo. The owner checks apply to DSCSA products only, unless the company's
Owner isolation for non-DSCSA products policy is on (see Choose the company's 3PL policies).
A delivery for several owners
One truck, one packing list or one set of supplier files can carry the goods of several owners, or an owner's goods and your own purchase. A receipt carries the units of one owner, or your own stock, only.
-
Create one receipt per owner, as in steps 1–5 above, each with its own Held for Owner. Receive your own goods on the receipt of your purchase order.
-
Attach each supplier file to its owner's receipt (3PL-IN-02). From Inventory ‣ Rx Tracking ‣ Attach Supplier Data (in the 3PL ‣ Operations section), Find Receipt proposes the receipts of the file's buyer: for Summit's file
3pl_ssp_open-receipt_DEMO-DPZ-20_6ea.xmlit lists only Summit'sWH/IN/00011, not Northwind's receipt from the same supplier. -
Sort the units by owner on the dock, and scan each owner's units on its own receipt (3PL-IN-03).
Result: each receipt holds its owner's units only. A unit that its supplier file announced for another receipt is refused in Scan Serials ("… was announced by the supplier for … receive it there."), and a transfer that mixes owners is refused ("… mixes DSCSA stock of several owners (…): one transfer per owner."; see Error: "… mixes DSCSA stock of several owners …").
If it doesn't work
- "…: hold DSCSA stock for the owner company Northwind Generics LLC, not for its contact Northwind Generics LLC, Dana Reyes." (at Mark as Todo): Held for Owner names a contact. Choose the company. See Error: "hold DSCSA stock for the owner company …".
- "…: Granite State Rx Supply LLC has no active owner profile, so DSCSA stock can't be held for it (Rx Tracking > 3PL).": the partner is not an owner, or its profile is archived. See Error: "… has no active owner profile …".
- "WH/IN/00021 is on our sale or purchase order: its DSCSA units can't be held for Northwind Generics LLC. …" (when you save): the receipt belongs to one of your purchase orders. Select Discard changes, and create a separate receipt for the owner. See Error: "… is on our sale or purchase order …".
- Held for Owner isn't on the form: see Held for Owner doesn't show although 3PL is on.
Next: Attach the supplier's EPCIS file to an owner's open receipt
Attach the supplier's EPCIS file to an owner's open receipt
Suppliers usually send their EPCIS (Electronic Product Code Information Services) file to the owner, who forwards it to you. Attach it to the owner's open receipt, before or when the goods arrive: the units it announces become Expected, and the file counts as the supplier's data, so nothing is held when you validate the receipt. When you don't know which receipt the file belongs to, the menu's Find Receipt proposes one.
Who: Rx Tracking User or Manager
Requires: Rx Tracking (DSCSA): 3PL and title model, with 3PL switched on.
Before you start:
- The owner's receipt is Ready. See Create a receipt held for an owner.
- The supplier's EPCIS 1.2 XML file (
.xml) is on your computer. - The file names the owner as the buyer, and your warehouse as the ship-to location or you as the possessing party. The owner's GLN (Global Location Number) is recorded on the owner company, and your company's GLN is set. See Onboard a trading partner: DSCSA role, GLN and address and Set the company GLN and GS1 prefix length.
-
Go to Inventory ‣ Rx Tracking ‣ Attach Supplier Data (in the 3PL ‣ Operations section).
Result: the Attach Supplier Data window opens, with Supplier Data set to Supplier's EPCIS file.
-
Under EPCIS File, select Upload your file and choose the file, for example
3pl_nwg_open-receipt_DEMO-DPZ-20_6ea.xml. -
Select Find Receipt.
Result: Receipt shows the open owner receipt that matches best, for example
WH/IN/00010, with its Owner. Under Matching Receipts (best first), up to five open owner receipts are listed with the reasons they match: "the file's buyer is …", "it ships to this warehouse", "its PO business transaction names …", "N case or serial identifier(s) match", "N product(s) of the file are on the receipt", and "PO number … matches (advisory only)"; "no matching criterion" when none applies.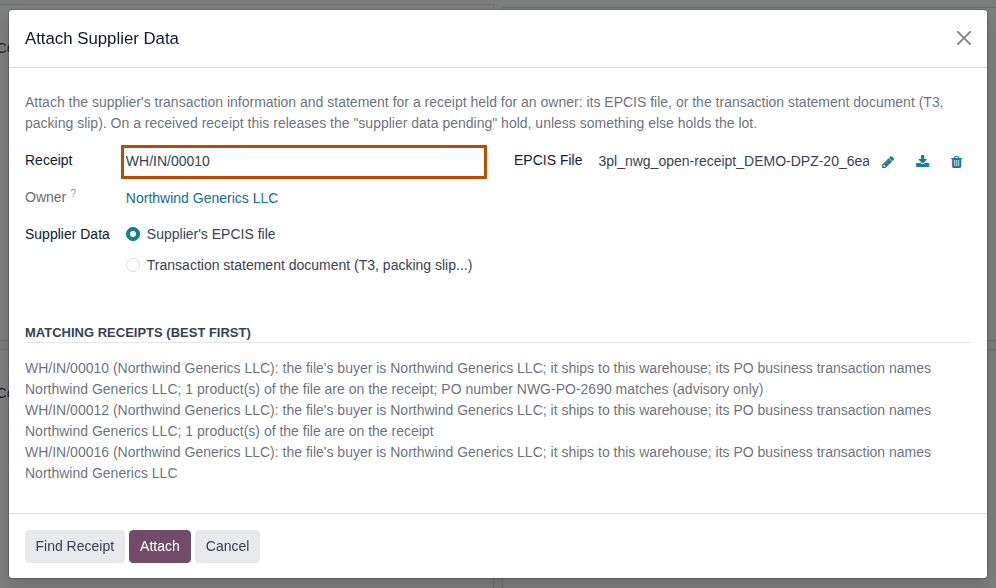
-
Check the proposed receipt against the reasons, and against the goods you expect. If another receipt is the right one, choose it in Receipt.
-
Select Attach.
Result: the file opens as a Supplier EPCIS File in the Awaiting Receipt state. It shows Owner (
Northwind Generics LLC), Custody Only (cleared), Imported On (Open receipt; the second Imported On, under File, is the import date, PF-W14-01), the parties' GLNs, and each announced serial as Expected; its Received / Expected smart button shows, for example,0 / 6. -
Select the receipt's name in the Receipt field to go back to the receipt.
Result: the yellow banner and Record Owner Confirmation are gone. The receipt has the smart buttons EPCIS Files (
1) and Expected, and an Expected (EPCIS) tab.
Result: the receipt expects the units the supplier announced for the owner. Records: the Supplier EPCIS File (Awaiting
Receipt), with the owner, the file and its hash; one Expected package per announced serial; the lot, if it is new (for example
BPDPZ2509G); a chatter note on the receipt, "6 package(s) expected from EPCIS file … (0 inferred from sealed cases).". The file of an
owner receipt is kept for good: nobody can delete it.
From the receipt
When you have the receipt open, select Attach Supplier Data (in the header or in the yellow banner): the same window opens with the receipt already in Receipt. Upload the file and select Attach. The Import EPCIS button on the same receipt runs the same import with the same checks (see Import the supplier's EPCIS file on the receipt).
When the file names the owner as both seller and buyer
The file comes from the owner's own site or contract manufacturer. Attaching it turns the receipt into a custody receipt: see Receive the owner's own goods as a custody receipt.
If it doesn't work
A refused file is not imported at all. The Invalid Operation dialog says "FILE-NAME was not imported:" and lists every problem.
- "The buyer in the file has GLN 0614141000067, but Northwind Generics LLC has 0614141000050. …": the file is addressed to another owner (here Summit Specialty Pharma Inc.) or to you. Attach it to that owner's receipt; don't add the other owner's GLN to this owner. See Error: "The buyer in the file has GLN …".
- "The file ships the goods to location GLN 0614141002122, which is not one of our GLNs … and names no possessing party of ours …": the file doesn't describe a shipment to your warehouse. See Error: "The file ships the goods to location GLN …".
- "Choose the supplier's EPCIS file." or "Choose the receipt.": select Upload your file, or choose the receipt, first.
- For every other refused file, see Owner receipts and owner isolation.
Known issue (PF-A06-03, PF-W14-02): Find Receipt only ranks open owner receipts, and it pre-selects the best one even when the reasons are weak. When the file's buyer has no open receipt it may propose another owner's receipt (then Attach is refused by the buyer check), and a supplier's file for goods you already received (a late file) is proposed for an unrelated open receipt of the same owner: attaching it there is accepted, that receipt loses its yellow banner, and the done receipt stays held. Before you select Attach, check that the reasons include "the file's buyer is …" and a product, serial or PO number that fits. A late file goes on the done receipt: see Release a data-pending hold with the supplier's late EPCIS file. If a file was attached to the wrong open receipt, open the file and select Cancel Import (PF-A06-02 for the "Create the owner's receipt first" message).
Next: Scan and validate an owner receipt
Scan and validate an owner receipt
When the goods are on the dock, scan them on the owner's receipt and validate it, as for your own receipts. The difference: only the owner's units are accepted, and the received units, the stock and the inbound document are the owner's.
Who: Rx Tracking User or Manager
Requires: Rx Tracking (DSCSA): 3PL and title model, with 3PL switched on.
Before you start:
- The owner's receipt is Ready. See Create a receipt held for an owner.
- The supplier's file is attached (3PL-IN-02), or the owner's confirmation or the supplier's statement document is recorded (3PL-IN-04). Otherwise the lots are held at validation: see Receive an owner's goods before their data.
- The scanner is set up for Scan Serials. See Set up a handheld scanner for Scan Serials.
-
Go to Inventory ‣ Operations ‣ Receipts and open the owner's receipt, for example
WH/IN/00010(held for Northwind Generics LLC, source documentNWG-PO-2690). -
Select Scan Serials, scan every unit (or each sealed case's SSCC label), then select Register, as in Scan units onto a receipt with Scan Serials.
Result: the chatter says "6 DSCSA package(s) scanned.", and the DSCSA Packages tab lists each unit.
-
Select Validate.
Result: the receipt is Done. The smart buttons EPCIS Files and DSCSA Documents appear, the DSCSA Packages tab shows each unit In Stock, and the chatter says "EPCIS reconciliation: 6 package(s) received. Everything matches the supplier's file.".
-
Optional: select the DSCSA Documents smart button to open the inbound document.
Result: the document is Posted, numbered with the owner's code, for example
DSCSA/NWG/IN/2026/00002, with Direction Inbound (received), OwnerNorthwind Generics LLCand Trading Partner the supplier.
Result: the owner's units are in stock and held for the owner. Records: the receipt, Done; one package per unit, In Stock, whose
form shows Held for Owner (Northwind Generics LLC); the owner's stock of the lot (Held for Owner in
Inventory ‣ Reporting ‣ Locations); the supplier's file, Received; the inbound DSCSA document in the owner's name. Odoo books no
stock valuation and no vendor bill for the owner's units. A receipt received on the owner's confirmation or on a statement document
posts no DSCSA document; its evidence stays on a resolved Supplier Data Pending discrepancy (the Discrepancies smart button).
The owner gets no receiving confirmation: the software sends it no notice and no email. Tell it yourself, or give it the owner portal
(Give an owner's contacts the owner portal), where it sees its stock and the documents
"Received for you".
The mismatches between the file and the units (missing, extra, wrong lot) are handled as on your own receipts: see Work a receiving discrepancy to resolution.
If it doesn't work
- "Line 1: Serial 600000020001 was announced by the supplier for Summit Specialty Pharma Inc.'s receipt WH/IN/00011: receive it there." (in Scan Serials): the unit belongs to another owner's shipment, or "… for our own receipt …" to yours. Set it aside and receive it on the receipt named. See Error: "… was announced by the supplier for …".
- "Serial … is already registered (state: In Stock). A duplicate serial is a suspect-product signal …": the serial is already in your records, for you or any owner. See Handle a duplicate serial at receipt.
- "WH/IN/NNNNN can't be validated: it moves DSCSA products (…) to or from a trading partner." followed by a line per problem: the owner, the supplier or your facility license failed the check. See Get an owner transfer through the owner, counterparty and facility checks and the facility checks troubleshooting page.
- "DSCSA owner isolation (3PL):" followed by one or more lines: see Owner isolation: what the refusals mean.
- "… can't be validated: scan one DSCSA serial for each unit being validated": units are missing from the scans. See Error: "… can't be validated: scan one DSCSA serial for each unit …".
Next: Put away and move an owner's units inside the warehouse
Record the owner's confirmation or the supplier's statement before validating
When no EPCIS file is coming, record what you have before you validate: the owner's confirmation that it holds the supplier's transaction information and statement, or the supplier's statement document (a T3 or packing-slip PDF, a portal page, an email, an EDI message). The banner goes away, and the receipt validates without holding any lot.
Your procedure decides what counts as the owner's confirmation and who may take it; the software requires a contact of the owner, a date that isn't in the future and a reference, and refuses the confirmation for an owner whose profile accepts only the supplier's data (Goods Before Data). Background: the modules accept the owner's recorded confirmation as release evidence (FD&C Act § 582(c)(1)(A)(i), § 582(g)(1); FDA interoperable exchange guidance (September 2023); see Compliance background). This is how the modules read the law; it has not been reviewed by counsel. See the disclaimer.
Who: Rx Tracking User or Manager
Requires: Rx Tracking (DSCSA): 3PL and title model, with 3PL switched on.
Before you start:
- The owner's receipt is Ready and shows the yellow banner "No supplier data yet for this owner's receipt: …". See Create a receipt held for an owner.
- For the owner's confirmation: the person who confirmed it is a contact of the owner company, and the owner profile's Goods Before Data is Supplier file, or the owner's recorded confirmation. See Set the owner's policies.
- The evidence file (the owner's email, the T3), if you have one, is on your computer.
-
Go to Inventory ‣ Operations ‣ Receipts and open the owner's receipt, for example
WH/IN/00039. -
Select Record Owner Confirmation.
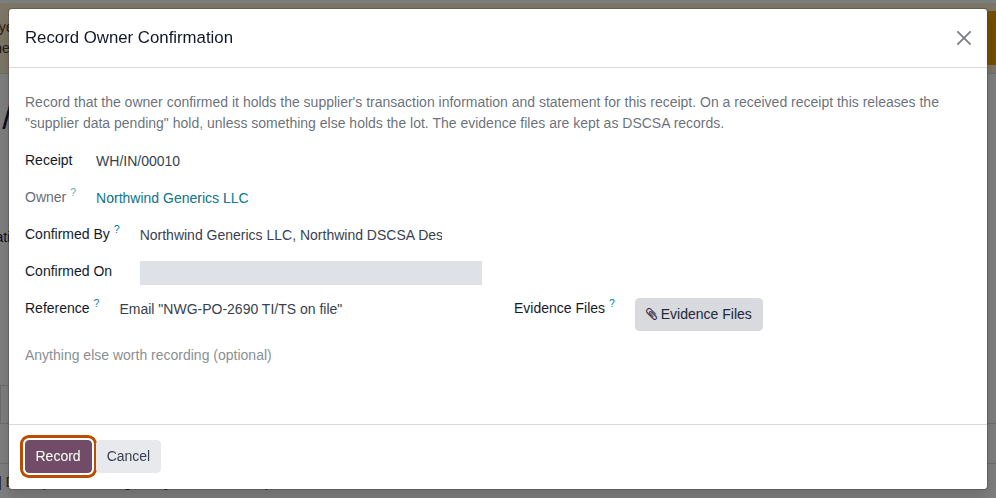
Result: the Record Owner Confirmation window opens with the Receipt, the Owner and Confirmed On (today).
-
Fill in:
- Confirmed By: who at the owner confirmed it, for example
Northwind DSCSA Desk - Confirmed On: the date of the confirmation
- Reference: where the confirmation can be found again, for example
Email "NWG-PO-2702 TI/TS on file" from Northwind DSCSA Desk - Evidence Files (optional): select it and upload the owner's email or letter
- the note field at the bottom (optional): anything else worth recording
- Confirmed By: who at the owner confirmed it, for example
-
Select Record.
Result: the window closes; the banner and Record Owner Confirmation are gone. The chatter says "Owner confirmation recorded by … on …", followed by who confirmed it, the reference, the evidence and the note.
-
Scan the units and select Validate, as in Scan and validate an owner receipt steps 2–3.
Result: the receipt is Done, its lots are not held, and the Discrepancies smart button shows one resolved discrepancy.
Result: the receipt is received without a hold. Records: a Supplier Data Pending discrepancy (for example DISC/2026/00011),
created already Resolved, that carries the confirmation (who, when, reference, who recorded it) and its evidence files; the evidence
files are kept for good. No DSCSA document is posted, because no supplier file was received.
With the supplier's statement document instead
-
On the receipt, select Attach Supplier Data and select Transaction statement document (T3, packing slip...).
Result: the window shows Where Was It Obtained?, Obtained On, Reference, Evidence Files and the checkbox "The supplier's statement affirms the §581(27) Transaction Statement".
-
Fill in the source, the date and the reference, upload the evidence (a T3 or packing slip PDF, a copy of the portal page or the email; for EDI or Other a reference is enough), and select the checkbox.
-
Select Attach.
Result: the banner is gone, and the chatter says "Supplier's transaction information and statement recorded by … on …" with the source, the date, the reference and the evidence.
The rules are those of your own receipts: see Record the supplier's Transaction Statement before validating.
If it doesn't work
- "Northwind Generics LLC's profile releases goods received before their data only with the supplier's data (EPCIS file or transaction statement document), not with the owner's confirmation.": the owner's Goods Before Data policy is Supplier file only. Attach the file or the statement document instead. See Error: "… releases goods received before their data only with the supplier's data …".
- "The date of the owner's confirmation can't be in the future.", or "Invalid fields:" with Confirmed By and Reference: correct the field and select Record again. See Errors when recording the owner's confirmation.
- "Confirm that the supplier's statement affirms the §581(27) Transaction Statement. …" or "Attach the evidence file(s): …": see Error: "Confirm that the supplier's statement affirms …" and Error: "Attach the evidence file(s) …".
- "The supplier's data is already recorded for WH/IN/00011." or "WH/IN/00010 has no supplier data pending.": the receipt already has its file, confirmation or statement. Nothing more is needed. See Error: "The supplier's data is already recorded …".
- "WH/IN/00045 is a custody receipt (the owner's own goods): it needs no transaction information or statement.": custody receipts need none. See Receive the owner's own goods as a custody receipt.
Known issue (PF-A06-04): Record Owner Confirmation is shown even for an owner whose profile accepts only the supplier's data. Filling in the window then ends with the refusal above. Check the owner's Goods Before Data policy before you fill it in.