Set up the company and warehouses for DSCSA
Core module For: Administrator Checked on 18.0.0.2.0
Give each company the identifiers that its DSCSA transaction documents use, before anyone receives or ships a DSCSA product. You do this once per company, and again only when an identifier changes.
Open the DSCSA settings of a company
Every company-level Rx Tracking option is in one block of the Inventory settings, DSCSA (Rx Tracking). Each option applies to the company you are working in; the building icon next to a setting's name (tooltip "Values set here are company-specific.") says so.
Who: Administrator with Administration: Settings, who is also Inventory Administrator and Rx Tracking Manager
Requires: Rx Tracking (DSCSA). Works in Odoo Community and Enterprise.
Before you start:
- Your user has the three rights above. See Give staff the right Rx Tracking access.
-
Go to Inventory ‣ Configuration ‣ Settings.
Result: the Inventory settings open, with Save and Discard at the top left.
-
In the Search... box at the top, enter
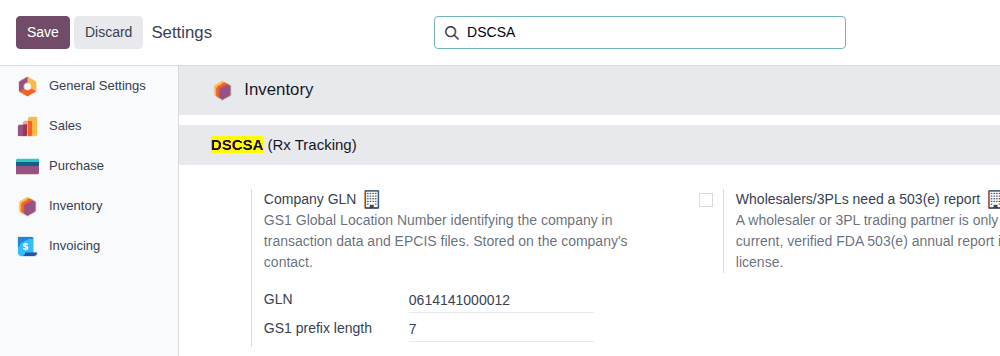
DSCSA.Result: the page shows the DSCSA (Rx Tracking) block, with the settings Company GLN, Wholesalers/3PLs need a 503(e) report, Small-dispenser exemption, EPCIS legal notice, Transaction Statement, Off-site write-once archive (S3) and DSCSA files in delivery emails.
-
Change the settings you need. The procedures below and on Set up DSCSA documents and delivery emails explain each one.
Result: "Unsaved changes" appears next to Settings at the top.
-
Select Save.
Result: the page reloads and shows the saved values. To leave without saving, select Discard instead.
Result: the values are stored on the company you are working in. Records: the company (the Company GLN is stored on the company's contact).
From the Rx Tracking menu
Go to Inventory ‣ Rx Tracking ‣ Settings (in the Configuration section) instead of step 1. The same settings page opens at the top; continue with step 2.
For another company
If your user works in several companies, select the company name at the top right of the screen (the company switcher), then select the other company. Repeat steps 1–4: the block now shows and saves that company's values. See Set up and work in a multi-company database.
If it doesn't work
- The page has no DSCSA (Rx Tracking) block: your user is not Rx Tracking Manager. Ask an administrator to change your access rights. See The DSCSA (Rx Tracking) block isn't in the settings.
- The settings show only General Settings and no Inventory section: your user is not Inventory Administrator (known issue below).
- "You are not allowed to access 'Config Settings' (res.config.settings) records.": your user doesn't have Administration: Settings. See Error: "You are not allowed to access 'Config Settings'".
Known issue (PF-W02-01): a user who is Rx Tracking Manager with Administration: Settings but not Inventory Administrator sees Inventory ‣ Rx Tracking ‣ Settings (in the Configuration section), but the page it opens has no Inventory settings and no DSCSA block, and no message says why. Give the user the Inventory Administrator right as well, or have an administrator change the DSCSA settings.
Set the company's address, GLN and GS1 prefix length
The company's name, address and GLN (Global Location Number, see the glossary) identify your company as the seller in every outbound DSCSA document: the T3 report prints them, and the EPCIS file carries them. Background: GLNs identify the seller, buyer and locations in EPCIS files; the modules follow the reading that FDA doesn't require them, but the large wholesalers do (FD&C Act § 582(c)(1)(A)(ii)–(iii), § 582(g)(1)(A)–(B); § 581(22), (24), (26), (27); see Compliance background).
Who: Administrator with Administration: Settings, who is also Inventory Administrator and Rx Tracking Manager
Requires: Rx Tracking (DSCSA). Works in Odoo Community and Enterprise.
Before you start:
- Your company's 13-digit GLN, as GS1 US assigned it, and the length of your GS1 Company Prefix if it is not 7 digits.
- The company's legal name and postal address: street, city, state, ZIP and country. Enter them in the part Complete the company's name and address below, before the first DSCSA delivery.
-
Open the DSCSA settings: Open the DSCSA settings of a company, steps 1–2.
-
Under Company GLN, in GLN, enter the 13-digit GLN, for example
0614141000012. You may type it with spaces; they are removed when you save.Result: the GS1 prefix length field shows under GLN. On a company that had no GLN it appears now, showing
0. -
In GS1 prefix length, leave
0to use the default of 7 digits, or enter the length of your GS1 Company Prefix (6 to 12). -
Select Save.
Result: the page reloads; GLN shows the 13 digits without spaces.
Result: the company has its GLN. Records: the company's contact (GLN, GS1 Prefix Length). The same values show on the
company form (Settings ‣ Users & Companies ‣ Companies). DSCSA documents created from now on name the company by this GLN; in outbound
EPCIS files it appears as an SGLN, for example urn:epc:id:sgln:0614141.00001.0 for 0614141000012 with the default prefix length.
Complete the company's name and address
The EPCIS file of every outbound document needs the company's street, city, ZIP and country, and for a US company its state. If one of them is missing, the delivery still validates and its document posts with the T3 report only, without its EPCIS file, and nothing warns you before. A new database's company has no street, city, state or ZIP.
-
Go to Settings ‣ Users & Companies ‣ Companies and open the company.
Result: the company form opens on its General Information tab. On a new database the company is called
My Company, and Address shows only the grey placeholders Street, Street 2, City, State and ZIP (the country may be filled in). -
In Company Name, enter the company's legal name, for example
Demo Rx Distribution LLC. -
Under Address, fill in:
- Street: for example
1450 Park Avenue(and Street 2 if the address has a second line) - City:
Chico - Country:
United States - State:
California (US) - ZIP:
95928
- Street: for example
-
Select the ☁ (Save manually) icon next to the company name at the top.
Result: the form shows the saved name and address, and the chatter logs the change of Company Name.
Result: the company has its name and address. Records: the company and its contact (Contacts, then open the company: the same name and address, and the chatter logs the change). DSCSA documents created from now on print this name and address for the seller on the T3 report and carry them in the EPCIS file; documents created before keep the address they were created with.
Known issue (PF-A03-01): the warning before shipping (the yellow banner on an open delivery and the GLN missing activity) checks only the GLNs. An incomplete company address isn't warned about: the delivery's document posts without its EPCIS file, and the file can't be added afterwards. Complete the address before the first DSCSA delivery.
On the company form
-
Go to Settings ‣ Users & Companies ‣ Companies and open the company.
-
In GLN, enter the 13-digit GLN.
Result: GS1 Prefix Length appears under it.
-
Set GS1 Prefix Length as in step 3 above.
-
Select the ☁ (Save manually) icon next to the company name at the top.
Result: the company is saved; the DSCSA settings show the same GLN.
If it doesn't work
-
"GLN 'DIGITS' has an invalid check digit: the last digit should be N, not M. Check for a typing or scanning error.": the last digit doesn't match the other twelve, which is usually a typing error. Enter the GLN again from your GS1 US record. The same entry covers "must have 13 digits" and "must contain digits only". See Error: "GLN '…' has an invalid check digit".

-
"The GS1 company prefix length must be between 6 and 12 (it is N). Leave it empty to use the default of 7.": enter a number from 6 to 12, or
0. See Error: "The GS1 company prefix length must be between 6 and 12". -
After you select Close on either message, the wrong value stays on the screen and nothing is saved. Correct it and select Save, or select Discard to keep the saved value. On the company form the same messages open an "Oh snap!" dialog: select Stay here to correct the value, or Discard changes to keep the saved one.
-
A delivery's DSCSA document shows the yellow banner "No EPCIS file was generated: sender.street is required." (or
sender.city,sender.zip,sender.state,sender.country): the company's address was incomplete when the delivery was done. Complete it (Complete the company's name and address); that document stays without its EPCIS file, and the next deliveries get theirs. See Warning: "No EPCIS file was generated: …".
Next: Give a warehouse its own GLN
Give a warehouse its own GLN
A warehouse without its own GLN uses the company GLN as its location in outbound EPCIS files. Give a warehouse its own GLN when the site has one, for example a second site.
Who: Inventory Administrator; no Rx Tracking right needed
Requires: Rx Tracking (DSCSA). Works in Odoo Community and Enterprise.
Before you start:
- The company GLN is set. See Set the company's address, GLN and GS1 prefix length.
- The warehouse's 13-digit GLN.
-
Go to Inventory ‣ Configuration ‣ Warehouses and open the warehouse.
Result: the warehouse form shows GLN under Address; when it is empty it shows "Company GLN when empty".
-
In GLN, enter the warehouse's 13-digit GLN, for example
0614141000913.
-
Select the ☁ (Save manually) icon next to the warehouse name at the top.
Result: the warehouse is saved with its GLN.
Result: outbound EPCIS files of deliveries from this warehouse name it as the shipping location, as an SGLN split with the company's
GS1 prefix length (urn:epc:id:sgln:0614141.00091.0 for 0614141000913). Records: the warehouse. To go back to the company GLN, clear
GLN and save.
If it doesn't work
- A dialog shows "GLN 'DIGITS' has an invalid check digit: …", "must have 13 digits" or "must contain digits only": correct the GLN. In the dialog, select Stay here to correct it, or Discard changes to keep the saved value. See Error: "GLN '…' has an invalid check digit".
- Inventory ‣ Configuration isn't in the menu: your user is not Inventory Administrator. Ask an administrator.
A duplicated warehouse doesn't copy the GLN: enter the new warehouse's own GLN, or leave it empty to use the company GLN.
Set the company time zone used for lot expiry dates
Rx Tracking stores a lot's expiry date as noon of that day in the company's time zone, so every user and every job sees the same date. Without a time zone the company uses UTC, which gives the right calendar date in every US time zone: a company in the US has nothing to do here. A company elsewhere, or one that wants the time zone recorded, sets the Timezone of the company's contact, which no form shows (known issue below), by exporting and importing that contact. The first company of a database has no time zone; a company added later in Settings ‣ Users & Companies ‣ Companies gets the time zone of the user who created it. The export below also shows which one a company has.
Who: Administrator (Administration: Settings)
Requires: Rx Tracking (DSCSA), and the Contacts app. Works in Odoo Community and Enterprise.
Before you start:
- The time zone name you want, as Odoo lists it (for example
America/Los_AngelesorAmerica/New_York). - A spreadsheet program or a text editor.
Export the company's contact
-
Go to Contacts, enter the company's name (for example
Demo Rx Distribution LLC) in Search..., and pressEnter. -
Select the List view button at the top right, then select the checkbox of the company's own line (the one that shows only the company name, with nothing after a comma).
Result: "1 selected" and an Actions button appear at the top.
-
Select Actions, then Export.
Result: the Export Data dialog opens.
-
Fill in:
- I want to update data (import-compatible export): selected
- Export Format: CSV
-
In the Available fields search box, enter
Timezone, then select the + next to Timezone.Result: Timezone is added to Fields to export.
-
Select Export.
Result: the browser downloads a CSV file with the columns
id, …,tz. Theidcolumn holds the contact's external ID (for our own company,base.main_partner).
Import the time zone
-
Open the file, delete every column except
idandtz, enter the time zone name in thetzcolumn (for exampleAmerica/Los_Angeles), and save it as CSV. -
Go back to Contacts in the list view, select the ⚙ (Actions) icon next to Contacts, then select Import records.
Result: the Import a File screen opens.
-
Select Upload Data File and choose the file.
Result: the columns are matched:
idto External ID andtzto Timezone. -
Select Test.
Result: "Everything seems valid."
-
Select Import.
Result: the contact list opens with the message "1 records successfully imported".
Result: the company's contact has the time zone. Records: the company's contact (Timezone). Lots that get an expiry date from now on use it; dates already stored keep the day they show.
If it doesn't work
- Test reports "The file contains blocking errors" and "Value 'NAME' not found in selection field 'Timezone'": the time zone name is not one of Odoo's names. Select See possible values in the message, or copy the name from the Timezone field of your own Preferences, and upload the corrected file.
- Test reports an error on the
idcolumn: theidvalue was changed. Export the contact again and keep itsidexactly as exported.
Known issue (PF-A01-06): no form shows the company's time zone, so the only way to set or check it is the export and import above. A company in the US can leave it empty.